30 September 2011

Make it Crafty Challenge

Hello there, if you are here for the Make it Crafty Blog Hop which will be running until 12th October please click on the Blog Hop banner on the right →


OK peeps, this weeks challenge involves colouring "sheer clothing" - yep you know the see through outfits the designers get the uber stunning models to wear on the catwalks!!

I gulped when Barbara and Zoe suggested this one, mainly because you've got to colour 2 layers - not only the sheer clothing on top but the fabric or body underneath!!

Now, I didn't think I'd get away with one of the new MIC Mischievous Elves sporting see-through clothing - and the gingerbread men are practically naked already so I've played safe and used a Hanglar stamp to try my hand at this particular challenge......


 I started by penciling in the dress under the area I intended to make look like sheer fabric, inking it in very lightly with a Copic Multiliner 0.1.  Remember, the pattern on the dress underneath will not be as bold due to the fabric covering it!

Once that was dry and I'd erased my pencil marks I set to colouring the spotty dress, using bold colours for the sleeves and bottom of the dress and softer tones for the middle section - and "don't forget to use your greys" - they will give your drawing depth and dimension!!

OK, at this point I took a deep breath and dived in with a pale flesh tone for the outer edges of the sheer fabric not covering the dress, then I stopped (using Copics that is)  This is where I swapped to Caran D'ache pencils (Prismas will be fine for this too) because I could get the colour to lie on top of the Copics. 


What I was trying to do was give the impression of a light, floaty material sitting on top of the spotty dress.  What do you think?

Image: Hanglar Stanglar
Paper: Basic Grey Cappella Paper Pad
Misc: Make it Crafty Butterfly Chippie
Lili of the Valley sentiment stamp
Memory Box Elegant Scrollwork die
Stempelglede Vintage Garden Stamp
Magnolia Border die
Flat pearls
Colouring: Copics (see below) and Caran D'ache Supracolor Soft

I'd like to enter this card in to the following challenges:

The Play Date Cafe: "Colours - Wine, Smudge, Leather and Parchment"
Delightful Challenges: "Pearls and Swirls"
Digistamps 4 Joy: "Anything goes"
Inky Impressions Challenges: "Punches or dies"
Simon Says Stamp: "Anything goes"
The Paper Shelter: "For the girls"

I look forward to seeing your wonderful "Sheer Challenge" entries in the Make It Crafty Gallery HERE
27 September 2011

Make It Crafty Christmas Blog Hop with Blog Candy

Welcome one and all!

Hee hee, the Design Team have temporarily taken over  the blog whilst we celebrate Zoe's birthday today, yep that's right.......

Happy Birthday Zoe!
To commemorate this joyous occasion, we're so excited to bring you a
Birthday Blog Hop with a Christmas theme!!!

The Design Team wanted to celebrate Zoe's Birthday in style so there's lots of inspiration, prizes, freebies and even a gallery album for you to post your own birthday greetings to our Zoe.

This is one hop you don't want to miss!


Zoe has some fabulous new Christmas images that were released today and we've been working really hard to produce some amazing cards to show them off!

From today until Sunday, 2nd October she is offering 15% off ALL digi stamps in the Christmas Category HERE


But the fun doesn't stop there!
 every Design Team member on the hop is giving away

****BLOG CANDY****
You'll have two weeks to leave a comment on this blog post and I'll be posting my lucky winner here on Friday, 14th October.


Oops, nearly forgot....................we've got yet another surprise for you!!
We contacted one of Zoe's artists (S.H) and she's very kindly drawn us this gorgeous party girl for the occasion - how cool is that!


Introducing "Party Girl Zoe"

We wanted to make sure that everyone was included in our celebration so we're giving her away as a FREEBIE to everyone who wants to join in with our celebrations!!!

All you need to do is create a new project using a Make it Crafty image or chippies and upload it into the Gallery HERE by 12th October.

Then email Barbara here with a link to your project to claim her!


So are you ready for some Christmas inspiration?  
Time to sit back, relax and enjoy the myriad of inspiration from the Design Team:

Jane (ME)

Well you've come to the right place as I'm your first stop, oh yeah!


Image:
Make it Crafty New Christmas Digital Image
"Elf Delivery System" available HERE
Paper:
Craft Creations
Misc:
Quickutz Britannia Alphabet, Circles and Stars
Cuttlebug corner die
Make it Crafty Fancy Ribbon Sliders
Ribbon from stash and sewing machine

Copics:


For me this is a double celebration!
Why?

Well, believe it or not

Jane's Box of Colours Blog
will be celebrating it's 1st Birthday on 4th October!!!


So, I've decided to give away this
***BLOG CANDY BUNDLE***
to one lucky reader


BLOG CANDY BUNDLE
Ribbon, Foiled die cut greetings, Wishes elements, Silver and Gold peel-offs,
Blank Jigsaw, Beads, Mini Jigsaw pieces, White gel pen and over 30 charms

Thank you for dropping by, don't forget to leave a comment on this blog post for your chance to win the  
BLOG CANDY BUNDLE
 you have until 12th October!


Now it's time for you to hop on over to


25 September 2011

Make us Laugh

Did you know it is World Smile Day on October 7?
Well over at Pike’s Playground we thought we’d celebrate it by creating humorous cards for our latest challenge!!
Image: Dustin Pike Snowmen (Members Nov 2010)
Paper: Daisy and Dandelion Christmas Collection
Colouring: Copics and chalk ink
Additional: Ribbon from stash, Die-namics Snowflake die, Quickutz frame die

I'd like to enter this card in the following challenges:
The Paper Shelter - Anything goes
Sweet Stampin - Anything goes

So come on, what are you waiting for?
Create something that will make Dustin and the Design Team chuckle!

(PLEASE REMEMBER TO USE A DUSTIN PIKE DOODLE DRAGON DIGITAL IMAGE)
Post your entries
HERE

Hugs

24 September 2011

Make it Crafty - White Mist Challenge

The Make it Crafty Design Team have been playing around with "white mist" this week - a great technique for those upcoming Halloween projects!

All of the Design Team Misty masterpieces can be seen over at the
Make It Crafty Gallery HERE

Having never attempted something like this before I decided to take a photograph before and after:


To colour these goggles normally was a challenge, I can see I've missed a couple of shadows, but on a whole I am quite pleased with them.  Then came the scary part - adding mist.  I decided to add rather than attempt to incorporate mist whilst colouring as my chosen image was so detailed to begin with.

In order to ensure I was going to create realistic mist I googled for images and found that it hangs in and around objects in wisps rather than fog which covers more densly.

Here is the misty version:


I did try initially creating mist with my Caran D'Ache pencils but found it just didn't give the wispy appearance I was after, so I erased it and went with option two, Chalk ink.  This I applied with a cotton bud, adding layers of ink until I was happy with the density.

To get the mist to drift in and around the goggles I masked parts of them and the leaves enabling me to blob on the ink in the right areas - I am pretty pleased with the result - what do you think?

Image:
Make it Crafty Steampunk Googles

It's not surprising that I got through alot of Copic colours on this one:


Now come on, it's your turn to have a go - I really cannot wait to see how you guys interpret this challenge - please post your entries HERE

And don't forget we are having a Make it Crafty Blog Hop starting 27 September (Zoe's Birthday) and I'll be your first port of call - so mark your diaries.

Hugs

17 September 2011

Granny's been baking again!!

It's time for another challenge at
Make it Colourful

All you need to do this week is create something using ORANGE and BLACK
and enter it in to the new gallery HERE

To be honest I shouldn't really be colouring yet as my arm is far from healed but there is only so much daytime television this girl can take!!

Images:
 Make It Crafty - Spooky House
Mo Manning - Witches Trick, Pumpkins and Mummy
Stempelglede - Grunge Collection (for stamped edge)
Colouring:
Copics (listed below) and Distress Inks


I look forward to seeing all your amazing orange and black entries.

Hugs

11 September 2011

Stars and Stripes

It’s time again for another Pike’s Playground Challenge folks!
“Stars and Stripes”
Apologies for the shortness of this post but I am still having problems with my right arm and my left one is getting sore because it’s just not used to having to work so hard
Yep, it’s another outing for the snowman but he’s sporting a nice ice blue ensemble this time around.
You may not be able to see it that well in the photo but the Liquid Applique has had a bit of Stickles glue applied for that sparkly touch!
Now come on, if this one-armed bandit can get this card online (I completed it pre-injury) you guys can create something for this weeks competition – don’t forget you have to use one of Dustin Pike’s digital images.
Please post your entries HERE
Hugs

6 September 2011

Out of action

 I was bit of a numpty recently and sprained the middle finger on my right hand, but also managed to strain my right arm the same day.  The finger has healed, unfortunately because I decided to soldier on and continue using my right arm, it has not. 
I currently have my arm in a sling – more to stop me using it than anything else, in the hope that it will heal.  As a result I am having to put down my pencils (yep, I’m right handed!!)
Operating a mouse and typing left-handed are a challenge – so blogging is also off the agenda – I will still be visiting your sites, but please excuse the lack of comments – this piece has taken an age to tap out.
Back soon (hopefully)
Jane

3 September 2011

OK who stole my black ink?????

The theme of the Make it Colourful Challenge this week is:

"NO LINES"

Now there's no need to panic!  It doesn't mean you've got to draw your own digi, we'll save that for another time (only kidding)

A few weeks ago you may have heard and or seen the furore that Zoe caused by challenging herself to colour a Magnolia image having stamped it in really pale ink.

Well several of us had a go and not surprisingly the team decided it would make for an awesome challenge for you guys to try......................

For those who missed my first attempt click HERE

This is my effort for this weeks challenge:


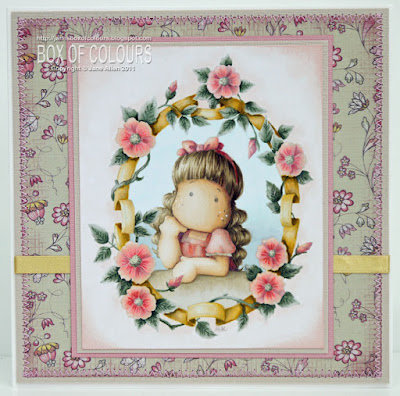
Image: Magolia Stamp, Make it Crafty - Ornate floral frame
Paper: Victoria and Albert Hanovarian
Colouring: Copics (see below)
Additional: Ribbon from stash


And here is a close-up of the no-line image itself. I love the soft, pastel like effect you achieve when you nolonger see those harsh black lines.


For stamps it's quite easy, you use a really pale ink, personally I chose Memento Angel Pink.  As for your digi's you need to alter the opacity in your graphics program - Zoe recommended about 20%, but wally brain here decided as this was my second attempt I'd reduce the opacity to 6%!! 

Hints, Tips and little snippets of wisdom (that's funny, coming from me)

Make a "Sanity Saver" - Print your image twice, once normally. ie dark, the second being your pale one which you will be adding colour to.
Your normal image is a guide, when you start adding colour the lines on your pale version will on occasion disappear and this second version will be invaluable (trust me)

Take it steady, don't rush it, without the lines you have to pay more attention
(on average allow for it to take you twice as long as a black lined image) 

Think shadows!
  No I'm not going insane (well, not yet) - You have to remember that in this challenge you don't have your trusty black lines to lets say denote where Tilda's face stops and her hand begins.  It's up to you to show this with shading and shadows - it's time to really use your greys!!!

For a more detailed guide about how to add depth and dimension to your images please click HERE

Quick note re copyright:
 when reducing the opacity of your digi images please make sure the artists signature is still clearly visible - I go over mine with a pencil when I'm done.

With this particular challenge you will find yourself looking at your image far more closely than you'll have ever done in the past.  It isn't an easy one, but believe me you will learn a lot if you give it a try, just ask my teamies!!

As you may be aware we are now asking you to post your entries to our new

There will be a gallery for each challenge each week. To enter the challenges, register for an account at the gallery and then post your card in the challenge entries gallery.
The MIC DT will be haunting the gallery and leaving love.
To keep all the inspiration in one place, the DT will display all their inspiration in the challenge DT gallery, they will also link to the products used in the photo description.
The gallery for this week’s challenge is here.

So why not pop along and see what my teamies have created to inspire you to join in this weeks challenge - I can't wait to see your entries.